Losing a Lingering "Mom Pooch"
Has your belly not exactly returned to its pre-pregnancy state? Are you having a hard time getting rid of that lower abdominal pooch? There several reasons why you may have a lower abdominal pooch:
You are stuck in an anterior pelvic tilt (this lengthens the abdominals putting them at a difficult angle to activate properly). This forward rotation of the pelvis can cause/perpetuate tight hip flexors
You don’t have good activation of the lower abdominal wall (deep Transversus Abdominus (TA) and lower rectus abdominis). Inability to active your TA has been repeatedly correlated to the presence of low back pain
You have a weak pelvic floor
You have poor diaphragmatic breathing/poor rib cage mobility
You have Diastasis Recti
Your C-section scar is adhered to other tissue
If you are suspicious that you may have one of the conditions above, try some of the activities listed below. If you test positive for any of these, then jump to the section in this blog that explains what you can do to fix your specific problem.
How to test for which you have:
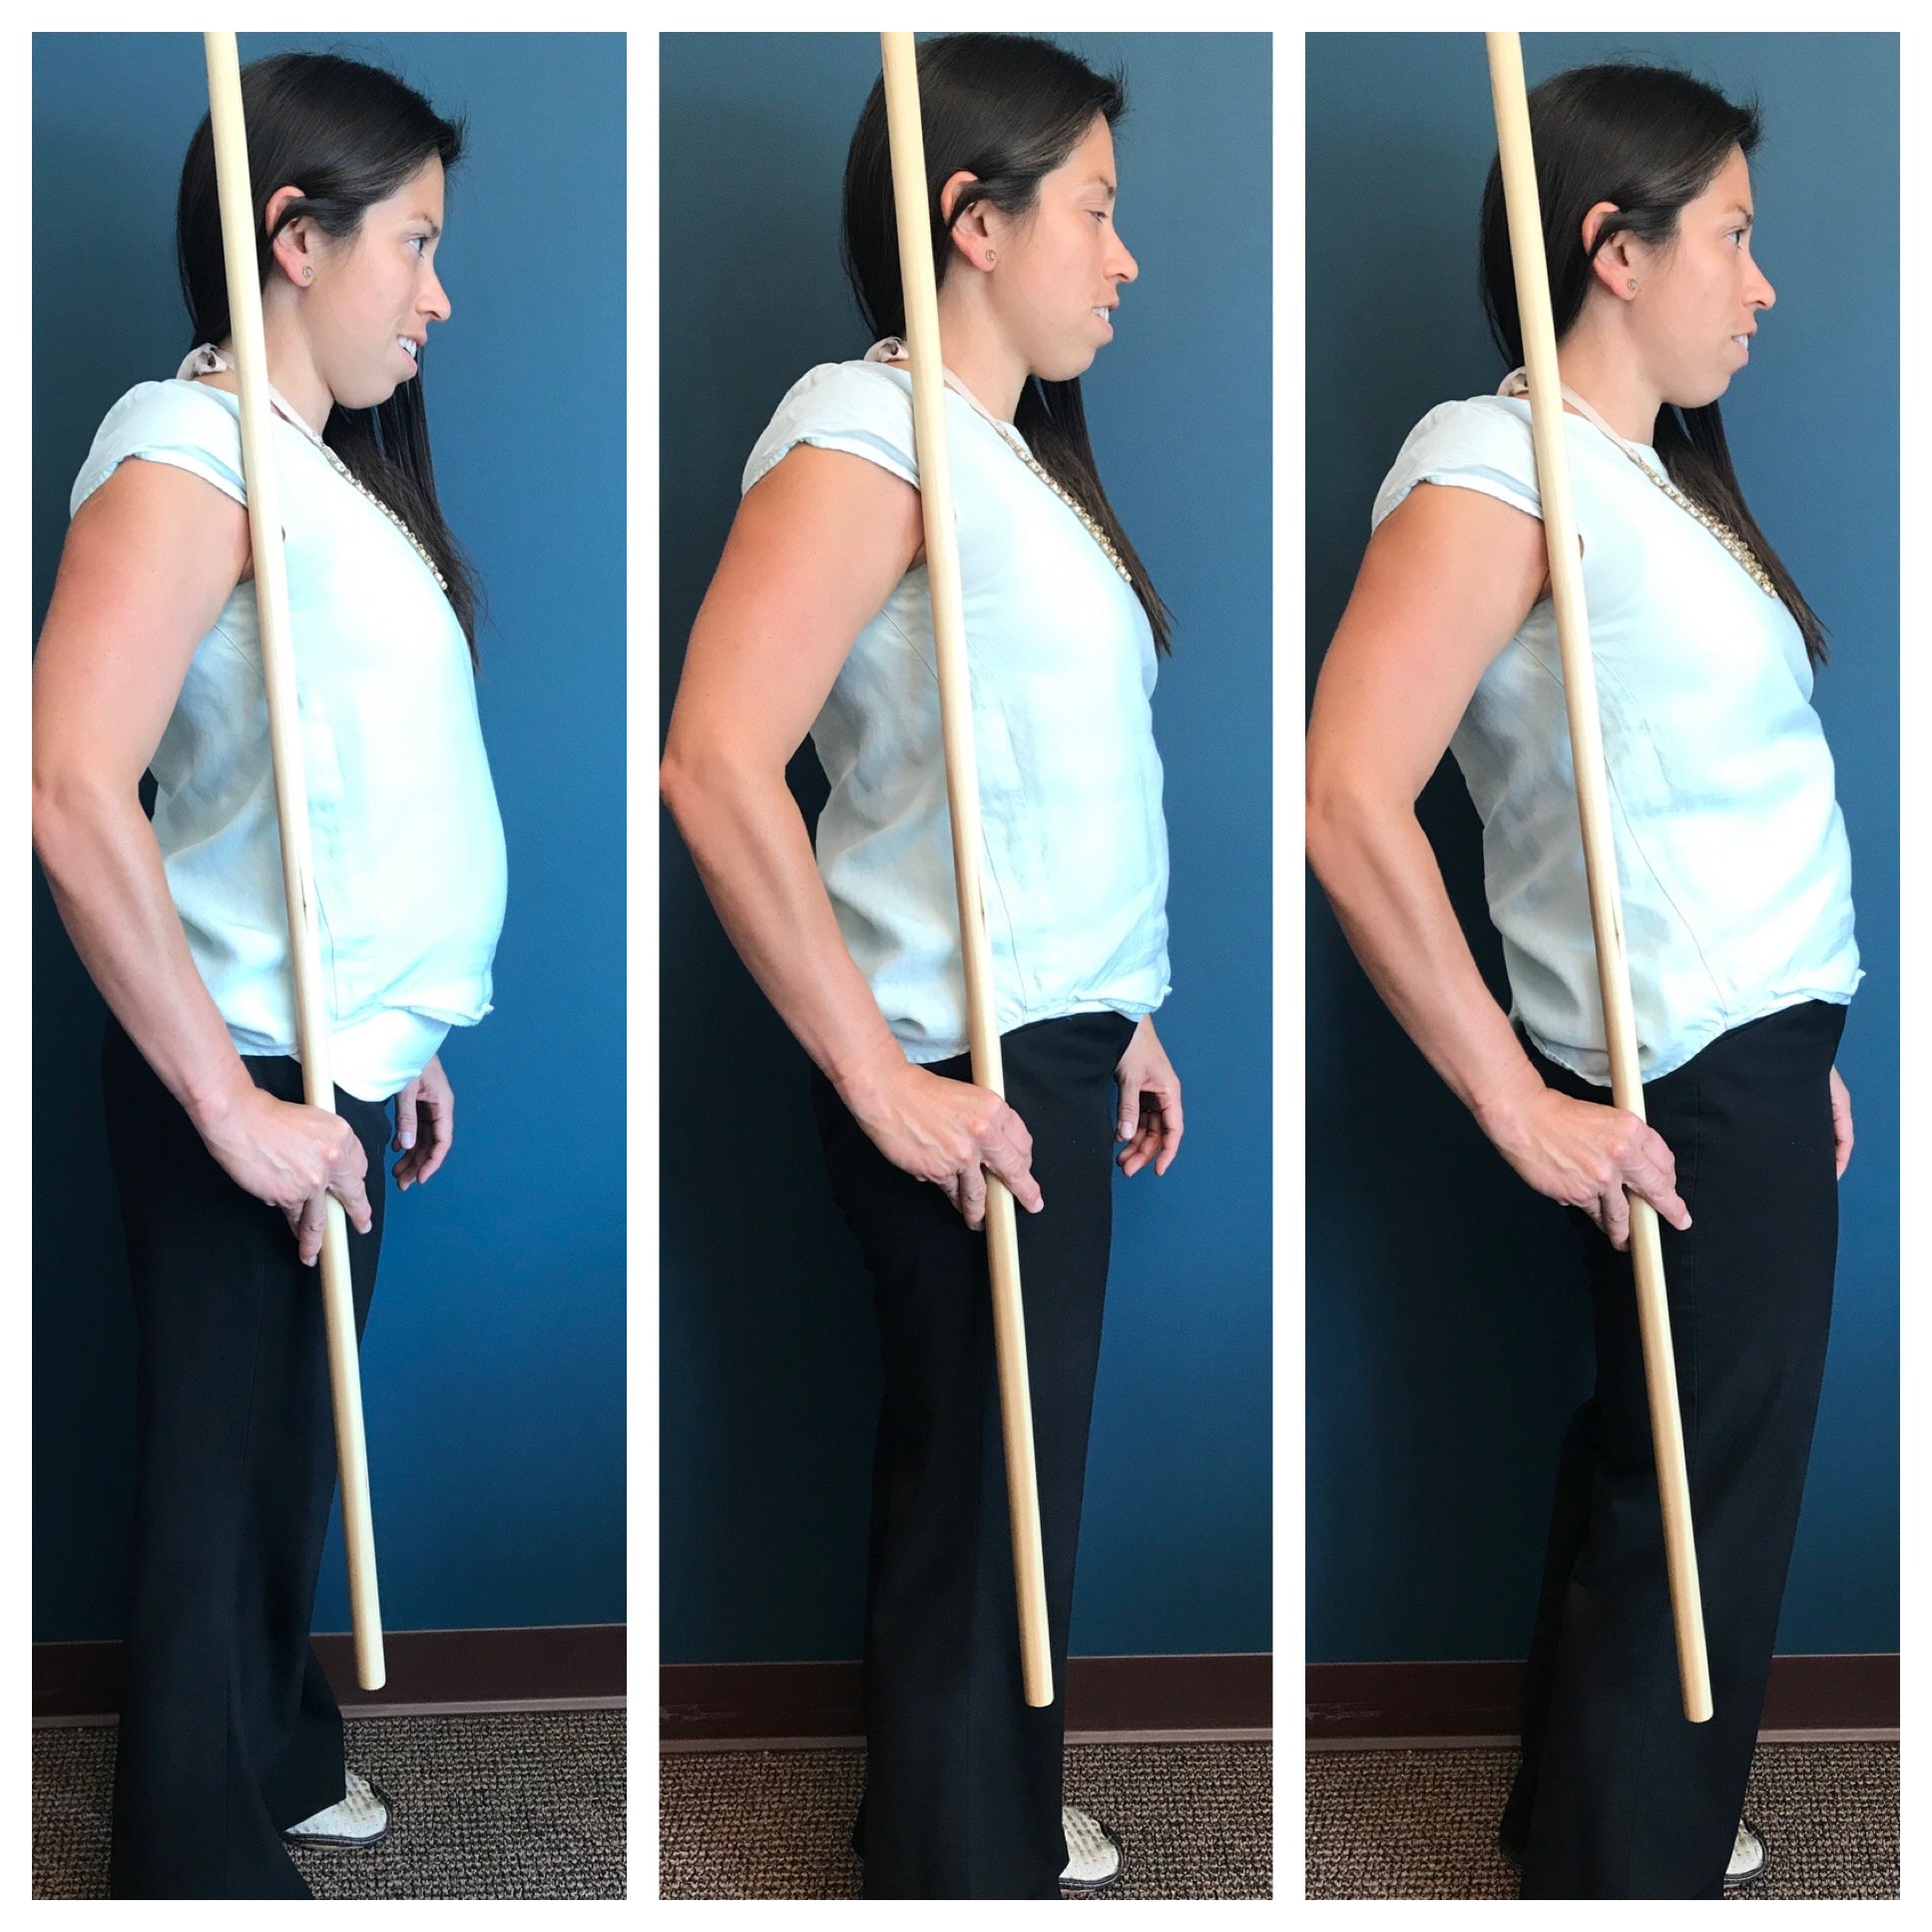
Anterior pelvic tilt- see photo to the right and watch the linked video!
Lie on your back and place your fingers in the center of your belly, just above the belly button.
Slowly lift your head until your shoulder blades are off the bed while feeling if you are able to insert your how many fingers you can insert between the belly muscles.
Put your head back down, place your fingers in the center of your belly just below the belly button.
Slowly lift your head until your shoulder blades are off the bed while feeling how many fingers you can insert between the belly muscles.
If you have a separation you will feel your fingers sink into the abdominal cavity. Your fingers will go past the abdominal muscles which is like a shelf.
If you do have DR, find a local women’s health physical therapist to help aide in that recovery. If you do not have DR continue to be proactive with the deep core and the rest of the body.
Pelvic floor strength:
Signs of a weak pelvic floor:
Leak small amounts of urine when you cough laugh sneeze
Unable to control farting
Queeffing (“vaginal farting”)
Reduced sensation in the vagina
inability to wear a tampon comfortably
note: Pain or difficulty with tampon insertion can also be related to pelvic floor tightness. Here we are referring to an inability to keep a tampon inside your body.
This is easily tested by a trained women’s health physical therapist. Please do not hesitate to see one if you are struggling or are unsure
FIXING ANTERIOR PELVIC TILT
Loosen the tight muscles and strengthen the weak muscles!
Tight- Erector Spinae, Hip flexors, Quadriceps, Iliopsoas
Weak- Lower abdominals, Glutes, Hamstrings
STEP ONE ▿
Hips are a MOBILE JOINT. So the key is opening up your hips and trunk. This way the iliopsoas stays long and tall and you can easily attain a healthy, upright posture.
Piriformis stretch, option to add a lacrosse ball
Self trigger point treatment for lumbar spine (see our videos on pain post-epidural for how-to’s)
Foam rolling your quadriceps
STEP TWO ▿
Strengthen your core and other muscles that support it:
Leg lifts
Side lying hip abduction
Band walk
Hip adductor
TA activation
Lower abdominal strengthening
STEP THREE ▿
Modify Activities
If your job forces you to sit for long periods of time,
get up and move periodically
create gentle flexion and extension of the spine
Cat/Cow
Double knee to chest
Sitting pelvic clocks
Work hip stretches into your day
Diaphragmatic breathing, consciously envisioning breathing deep into your abdominal cavity
STEP FOUR ▿
If all else fails. Find a baller physical therapist that can release your iliopsoas. Sometimes too your viscera (guts) can adhere a bit to the iliopsoas which can be alleviated by some visceral mobilization work
Look at our blog post HERE (scroll down to section on “body alignment”) regarding stacking your ribcage over your pelvis.
Over-tight psoas muscle
During the end of pregnancy and postpartum the psoas muscle can be crazy tight. Postures and daily movement can exacerbate this problem such as sitting or cycling. Also during pregnancy and postpartum women tend to have weak lateral hip muscles (gluteus medius and minimus) so the hip flexor will take over and perform some of their tasks.
When too tight, this muscle can directly affect our low back, the activation of our pelvic floor, the functionally of our diaphragm, and visual esthetics of our core.
FIX YOUR WEAK PELVIC FLOOR
This area can be really hard to activate, but we have lots of great strategies for your to try at our blog post HERE
HOW TO ACTIVATE YOUR LOWER ABDOMINALS
It often takes some conscious effort to “re-activate” your abdominals after baby. They have been significantly stretched out, and this over-lengthening makes it hard for our body to “feel” them. The body can be a little forgetful of this muscle, but this is easily remedied by some good-quality “muscular re-education”.
Our deep transverse abdominis (TA) is the inner-most (deepest) abdominal muscle. Proper use of this muscle is what will create a nice, flat abdominal wall that won’t bulging out or cone when you sit up from laying or do any core-focused exercise.
How to activate:
Think about drawing the sides of your hip bones inward towards one another and than draw that upward like you are putting on a tight pair of pants.
Exercises to strengthen your lower abdominals:
TA Contraction: Heel slides
TA Contraction: Single Leg Lifts
TA Contraction: Marching
Diastasis Recti (DR)
Diastasis recti is separation between the two halves of your abdominal wall. To accommodate a growing baby, the connective tissue that usually attaches the two halves of your abdominal wall starts to thin as your abdominal wall stretches This happens in every single pregnancy and is considered normal to some extent. This “thining” however can often progress to significant defects or “tears” in the tissue where there is then a more dramatic hole/gap occurs between the middle “line” of your “6-pack”. Activities that cause a strange looking “bulge” in the middle of your abdominal wall during pregnancy are best avoided as this is stressing tissue that is already fragile due to its stretched-out state. If you do not find out about DR until it has already happened then do not worry because it can be put back together and heal without surgery if caught at an appropriate time.
WHAT DO I NEED TO DO TO CORRECT Diastasis Recti?
My goal is to coach you and educate you about DR because there is a lot of misinformation out there. Please take advice from me as a physical therapist because the recovery is complex. I want you to know that the guides are written to avoid and heal DR. That being said, I do not think exercise is the ONLY thing you need to do to fix it. Healing DR also requires a change in your habits, gaining some body awareness, and in many cases may require individual expert attention. Fixing this problem often takes persistent hard work over a period of time. Below are KEY components of healing DR.
Proper core strengthening
Strengthening other areas you would think would have NO impact on your abdominal separation.
Diaphragmatic breathing and good rib cage mobility with breathing
Pooping properly (avoiding excessive pressure by bearing down), see next bullet point
Reducing daily intra abdominal pressure— you may be shocked at how much you hold your breath unnecessarily if you really start paying attention!
Posture (see “Stacking your Sh*t!)
Avoiding “doming” of the abdomen with activities (see picture at right)
Reducing loaded rotational movements (especially heavily loaded)
Our Expecting and Empowered App is a roadmap to healing your DR. Many women have healed gaps of 2-3 by doing the proper exercises, in the proper progressions. It has DR modifications for exercises you should skip until healed. All written by me!
How to fix your C-SECTION SCAR
Scar management helps to create the best possible healing of a scar. It is recommended that you wait at least 4-15 weeks to start this. You can start early if you are given the green light by your healthcare team. Often I find that no one is teaching women how to do this, so let me help! There are SO many benefits including reducing infection and aiding skin and tissue motion.
This is so important to know how to do because the scar can bind to the uterus, fallopian tubes and ovaries making subsequent pregnancies trickier. Postoperative intra-abdominal and pelvic adhesions are the leading cause of infertility, chronic pelvic pain and intestinal obstruction.(1) Also it looks nicer, so during the summer when you are back in that bikini you won’t have to worry about anyone getting a peek of a scar that looks suboptimal.
HOW TO DO IT:
To perform scar tissue mobilization, pinch the surrounding skin and surgical scar in your fingers rolling it in different directions. Up/down. Left/ right. Right diagonal/left diagonal. You can also “twist” stubborn areas to get them moving. Use your three middle fingers and place them over the scar. Rotate them clockwise and counterclockwise. Look for which directions cause movement restrictions when areas are stubborn. Once you find the restriction, keep holding it and take three deep breaths. When you do this, see if the scar softens and try to move the scar further into the restriction. It is crazy how much more movement you can get!
MOTHERS IN THE FIRST MONTHS POSTPARTUM
STEP ONE ▿
Create a scar mobilization kit. All you need is a few simple things.
A ziplock bag
Four 2x2 pieces of different cloths (these do not need to be exact but near the same texture)
Soft/fluffy
Felt
Burlap
Sandpaper
STEP TWO ▿
Start using the softest fabric in your little kit. Start 1 inch away from the scar and move closer to it as you get more comfortable. Once you get comfortable with one fabric move to the next and then work your way through the different movements.
Start with left/right full swipes and up and down over the scar
Next will be right and left diagonals
The last one is called using the key. It is called this because you use your middle three fingers and rotate counterclockwise and clockwise.
Lastly, do the key one but push down until you feel movement restriction and push and turn. While doing this make sure to take 3 deep breaths.
STEP THREE ▿
Start doing this daily
It can be hard to get time during the day with the littles
It only takes 5-10 minutes
Do it while baby is playing or watching tv
MOTHERS FURTHER OUT FROM BIRTH
Cupping
Lacrosse Ball
Tub: Aggressive movement